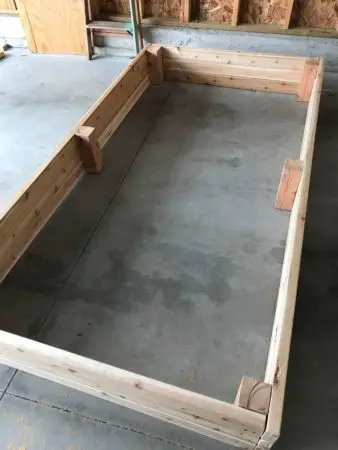
Did you guys know that out of the 30 days of April, we got rain for 20 of them? We’ve set records all over the place, and I’m writing this as a torrential downpour is happening outside of our windows. It’s raining so hard I know we’ll have some water pooling in the backyard, and am thankful we didn’t plant this weekend. This week we’re suppose to have a cold front come through and the weather lady says to cover your plants. Again, I’m glad we’re waiting a few weeks. However, I am SO excited to share with you that over the weekend we got a great start on our raised garden bed project: we (read: my husband) built our raised bed! I’ll walk you through how we decided on the style and share some tips for success.
Location:
First of all, we finally decided on a space in our yard to place the garden.
Most of our lot is sloped (not ideal) so it was a little tricky to figure out a great location. It’s all the way to the back of our lot and will get tons of sunshine! Casey and I were both having a hard time imagining killing off a portion of our nice (newish) grass, so we compromised on this spot. Many of the articles I looked at suggested breaking up the soil below the bed so the roots of the plants can grow down into the earth easily, and the grass in this particular area of the lawn has never really filled out, making it easier to justify busting up the ground.
Size:
I did a ton of research on raised beds and even shared some of the benefits in my blog about being a Garden Newbie if you want to catch up. We knew we wanted to have a substantial garden without biting off too much of a project so we settled on 8 feet by 4 feet, which gives us 32 square feet of real estate to work with. We can easily kneel and reach the center of the garden from both sides – so planting and weeding won’t be an issue. The other benefit of this size is that 8 feet is pretty standard for lumber so Casey didn’t have to do a TON of cutting.
Why Cedar:
We decided to use cedar for the structure for a couple of reasons:
- Naturally insect-resistant – which helps protect plants from the pesky bugs (especially being less than a mile from a lake)
- More rot-resistant than other types of wood
- Renewable resource: Cedar grows faster than many other types of trees + the entire tree can be used including the roots and bark which makes it a more eco-friendly choice overall.
Cedar tends to be a little bit pricier than the other types of boards we saw at Home Depot, but we felt it was worth the extra cost for the reasons above. Whatever lumber you choose, be sure it will hold up well outside and is untreated so there aren’t any chemicals leaching into the dirt.
What You Need:
Material List
- (9) 2″x4″ x 8′ Untreated Cedar (We bought 10 in case of a mistake. You will need every inch of nine boards)
- (1) 4”x4″ x 8′ Untreated Cedar
- (1) Box 2-1/2” General Purpose Screws
- A good electric screwdriver
The Process:
Cut List
- (6) Ends – 2″x4″ x 4′
- (6) Anchors – 4″x4″ x 11-1/4″ (Check the actual width of three 2″x4″s to ensure the length of the anchor will be accurate)
To get started on the cuts, measure three of the 2”x 4”s and cut them in half to get the end boards. Next, cut the 4 x 4 posts to a length of 11-1/4″ (which should be the same length as three 2”×4”s).
For the assembly, attach the end boards to the posts using 2-1/2″ screws. After the end boards are attached, you can then attach the 8′ sideboards to the posts. Finally, attach the center posts in the middle of the 2”x4” x 8’ sideboards. Center posts might not be necessary but will help limit warping in the longer boards.
You can add a weed barrier if you don’t plan to use the soil under the box. This is an optional step to slow the growth of unwanted plants. You will need approximately one cubic yard of dirt to fill the box.
You guys, Dane had SO much fun watching this process – he loved feeling the different textures of boards and helping push the metal cart in the store, maybe a little too much. We may have a little builder on our hands!
I’m sending a special shout out to my husband, for taking the lead on this project and building a really good-looking garden bed! All of the hard work is really going to pay off, and I can already taste the fresh veggies! Happy gardening!


